When a course’s size quota is exceeded certain actions can be taken to ensure that the course is brought below the 1 GB (or 1,024 MB) limit.
Note: Instructors of courses exceeding the quota limit will NOT be able to add additional material to the course until it is brought below the allotted limit.
How to Check Your Course Size
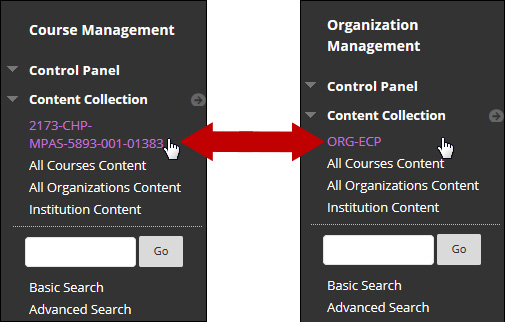
1. Under Course Management/Control Panel, expand the Content Collection area and click on the [Course ID]. This should be the first thing listed (it may be your actual course ID or a set of letters or numbers).

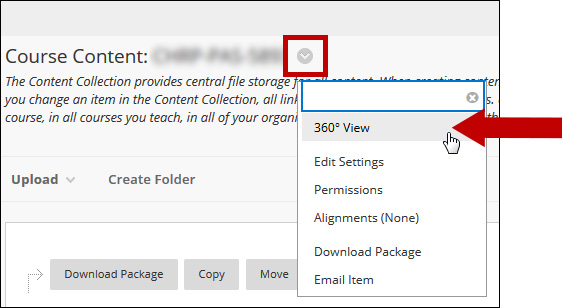
2. Click on the Options Menu chevron button next to the Course Content: [Course ID] header. Then, click on 360° View.

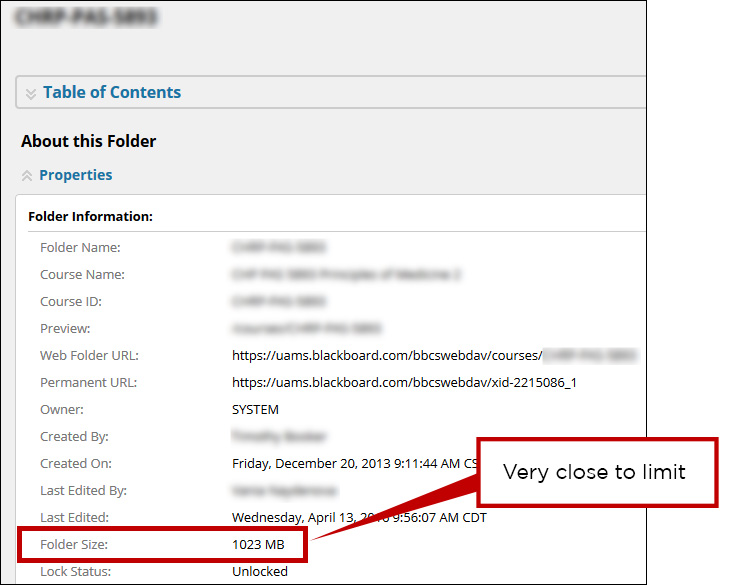
3. The size of the course files area will be displayed next to Folder Size under the Properties header.

4. If the value listed here is close to or over 1 GB or 1,024 MB limit, then it is a good idea to evaluate the content in the course and eliminate unneeded and/or redundant content. The rest of this tutorial will outline what to check and how to take appropriate action.
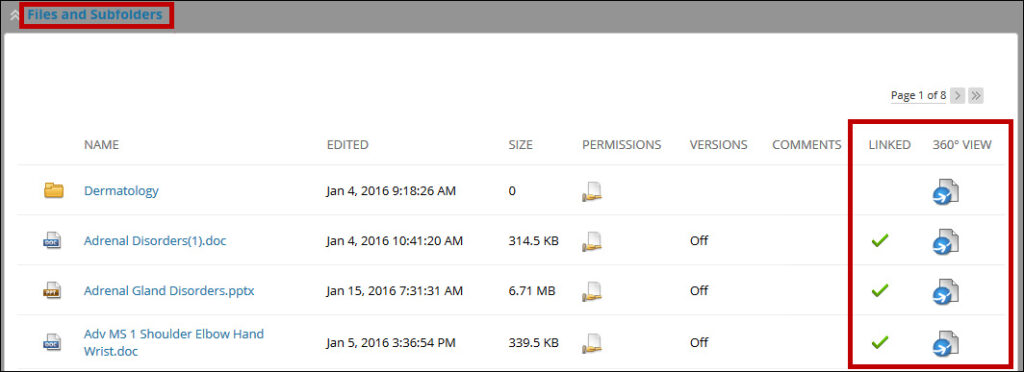
5. If you scroll down to the Files and Subfolders section you will be able to see a list of files and folders in your course. If the file has a green check mark under the Linked column that indicates that the file is being used and is linked somewhere in your course. If you want to find out where it is linked then you can drill down further by clicking the icon under 360° View

Best Practice: Reduce Your Course Size
1. Regularly clean out your course files area to remove duplicate files or unused files. For instructions on how to delete course files, see End of Semester Tasks/Deleting Course Files on the Help tab in Blackboard.
2. Video: Link to videos rather than upload video files to a course. You can upload your videos to the UAMS Video Index Server, YouTube, Vimeo, or other media server sites and then link to them within a course. Be mindful of intellectual property rules. For example, it might not be legal to host a video from National Geographic on Vimeo, even if you licensed it to use in a course.
3. Use mashups: Upload slide decks to SlideShare, video to YouTube™, or images to Flickr®. You can easily embed these elements in your course with the Blackboard Learn mashups tool.
4. Reduce file sizes: Before uploading, reduce file sizes for the following:
- Microsoft Office Files: Use the tools available in Microsoft Office to reduce file size for PowerPoint and Word files. The Reduce File Size option is located in the File menu. You can also save files as PDFs before uploading, which often makes smaller, read-only versions of the files.
- Images: Use a graphics program to resize images for screen viewing before uploading.
- Audio: Use software to resample or trim audio files to reduce their size.
- For narrated PowerPoints, use Impatica (software available for all UAMS faculty) to compress file size and make the content available to users on PCs, Macs, tablets, or smartphones.
